Integrating Figma with Cursor IDE Using an MCP Server to Build a Web Login Page
Introduction
Integrating design tools like Figma with development environments such as Cursor IDE can significantly enhance productivity. By utilizing the Model Context Protocol (MCP), developers can streamline the process of creating web pages directly from design files. This guide provides a straightforward approach to set up this integration and build a simple login page using Cursor IDE.
Step 1: Setting Up the Environment
Obtaining the Figma API Token
- Log in to your Figma account.
- Navigate to Settings > Security and select Generate new token.
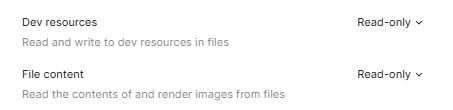
- Name your token and ensure you have read permissions on File content and Dev resources, then click Generate token.
- Copy and store the token securely for future use.
Installing N
To run the Figma MCP server, you will need to install N:
- Download the latest version of N from the official website.
- Run the installer and keep default settings during installation.
- Verify the installation by running the following commands in your terminal:
node -v– should return the N versionnpm -v– should return the npm versionnpx -v– should return the npx version
Installing Cursor IDE
Download Cursor IDE, which is free and offers a 14-day trial. Cursor is specifically designed for AI-assisted development and will facilitate the connection to the Figma MCP server.
Step 2: Configuring MCP Server on Cursor
After installing Cursor IDE, follow these steps to connect to your Figma MCP server:
- Open Cursor IDE and navigate to File > Preferences > Cursor Settings > MCP.
- Select Add a new global MCP server.
- In the configuration file, paste the following code:
- Replace YOUR-KEY with the Figma API token you generated earlier.
- Save the configuration file. You should now see “Framelink Figma MCP” listed under available MCP servers.
        "mcpServers": {
            "Framelink Figma MCP": {
                "command": "cmd",
                "args": ["/c", "npx", "-y", "figma-developer-mcp", "--figma-api-key=YOUR-KEY", "--stdio"]
            }
        }
Close the settings pane and start using the server by entering relevant prompts in Cursor’s chat interface. This will allow you to connect to your Figma file and generate code accordingly.
Step 3: Creating the Login Page Using Cursor AI
Using a Figma template, I instructed Cursor’s chat agent to generate both an HTML and a CSS file for a login page. Additionally, I requested modifications, such as updating footer text and adding animations, which Cursor executed seamlessly.
For your projects, use any Figma design by copying the frame URL and providing it to Cursor. To obtain the link:
- Open your Figma design.
- Right-click on the desired frame or element.
- Select Copy/Paste As > Copy Link to Selection.
- Paste this link into Cursor’s chat, and the agent will generate the corresponding HTML/CSS code.
Conclusion
The integration of Figma with Cursor IDE through the MCP server provides a powerful solution for developers seeking to enhance their workflow. By automating the code generation process, businesses can save time and resources while ensuring high-quality outputs. Embracing such technologies can lead to improved efficiency and innovation in your development processes. For further assistance in implementing AI solutions in your business, feel free to reach out to us.